Everything 8-bit all the time
If implementing a virtual machine sounds daunting to you, then this post is going to be a treat. Seriously, it isn’t hard at all. All we need is a struct, an enum, and a switch.
struct machine {
  uint8_t instruction_pointer;
  uint8_t stack_pointer;
  uint8_t register0;
  uint8_t register1;
  uint8_t memory[256];
}
Representing the machine in memory
This is how the entire machine is stored in memory; just five fields. As you may have guessed, this is written in C. In case you’re not familiar with that language, let me point out some things and then you can implement it in the language of your choice.
- A
structis a collection of fields. It’s like a class with only data members. - A
uint8_tis an unsigned integer of exactly 8 bits. C also has types like int, but the exact size of those is platform-dependent. In this case, I need everything to be exactly 8-bits all the time. uint8_t memory[256]means that the field memory is an array of 256uint8_ts.
Understanding the machine
The code you want the machine to run, needs to be present in the machine’s memory. That’s the same memory that will also hold your variables, so code and data will live in the same place. You can build your code from a limited set of instructions. Each instruction has a number. For example, the instruction that puts a value in the R0 register has the number 2. A similar instruction for the R1 register has the number 3. Then there’s an instruction to swap the two registers with the number 5. If I create a little program with those instructions, this is what it would look like in memory.
2 18 3 42 5
2– Put a value in R0.18– The value to put in R0.3– Put a value in R0.42– The value to put in R1.5– Swap R0 and R1.
When executing this code, the machine reads the instructions one-by-one. To keep track of where it is, it uses the instruction pointer. When the machine starts, the instruction pointer is 0, so it will look at the first byte in memory and starts executing there. In my example it will find the instruction 2, or as I refer to it in the source code set_r0. This particular instruction takes one more byte: the value to put in R0. So, after the machine has executed the instruction, the instruction pointer will be set to 2. Then it executes the next instruction and the instruction pointer will be set to 4. The final instruction in my example doesn’t need an extra byte, so after executing it, the instruction pointer only moves by one and is set to 5. Whatever happens next is a mystery, because I didn’t write any more instructions. The machine will, of course, just continue with whatever is in memory, so let’s hope it’s something interesting.
That’s all the machine does and it’s pretty much all it needs to do. I haven’t said anything about the stack pointer yet, and that’s because I haven’t implemented it yet, but we don’t even need it to build a working computer. I’ll have more to say about the stack in a later post.
Implementing instructions
My source code contains all the instructions the machine supports in an enum.
enum instruction {
  nop,
  jump,
  set_r0,
  set_r1,
  add,
  swap
}
As you’ve seen, the machine only understands numbers, but in my source code, I find it easier to use set_r1 instead of 3 and the enum takes care of that mapping for me. Every instruction gets a unique number. The final machine will support many more instructions, but this is my starting set.
Every instruction only does a very simple thing, so implementing an instruction is trivial. For example, here is the code for add.
uint8_t sum = machine->register0 + machine->register1;
machine->register0 = sum;
Even if you’ve never seen C code before, this shouldn’t be too hard to read: sum the values in register 0 and register 1, store the result in register 1. Other instructions are about the same complexity. So, the code for running the machine looks like this.
while (1) {
  uint8_t instruction = machine->memory[machine->instruction_pointer];
  machine->instruction_pointer++;

  switch (instruction) {
    case add: {
      uint8_t sum = machine->register0 + machine->register1;
      machine->register = sum;
    } break;

    case set_r0: {
      uint8_t value = machine->memory[machine->instruction_pointer];
      machine->register0 = value;
      machine->instruction_pointer++;
    } break;

    // ...and a bunch of other instructions.
  }
}
As I said: not hard at all.
Out of memory
All the registers in my fictional processor are 8-bit, but if you look up some actual 8-bit processors, you’ll find that they usually have an instruction pointer that’s wider than that. That’s because, even in the early 1970s, programmers expected more memory than 256 bytes. With an 8-bit instruction pointer, you can only point to the instructions from address 0 up to address 255. After that, the instruction pointer just wraps around to 0 again. If you take my source code, you can try this yourself. Increase the amount of memory to 1024 (or whatever) and run the machine. You’ll see that it will never execute the instructions after address 255. I like the simplicity of everything being 8-bit and I believe having only 256 bytes of memory will encourage you to be creative with the programs you come up with. Still, if it turns out that this choice encourages too much creativity, I might increase the instruction pointer to 16-bit and, consequently, the memory size to 64KB.
Source code
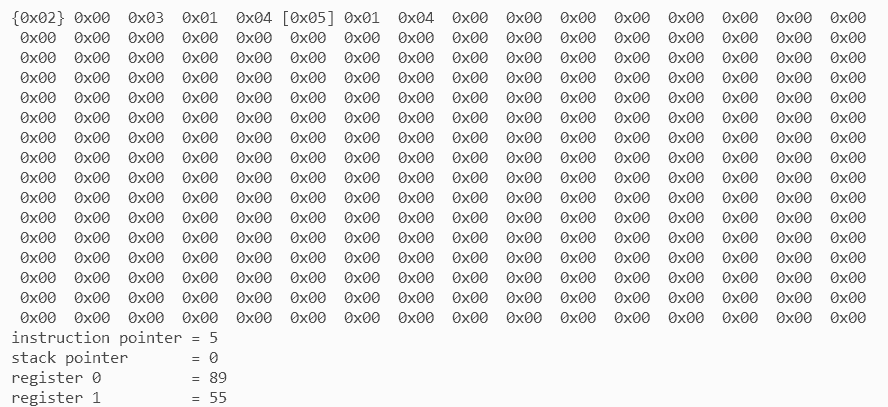
If you’re a Patreon supporter on the Source Code tier, you can grab the source code from GitHub. When you run the machine, it dumps its complete state—memory and registers—to the console each step. This allows you to see what’s going on.