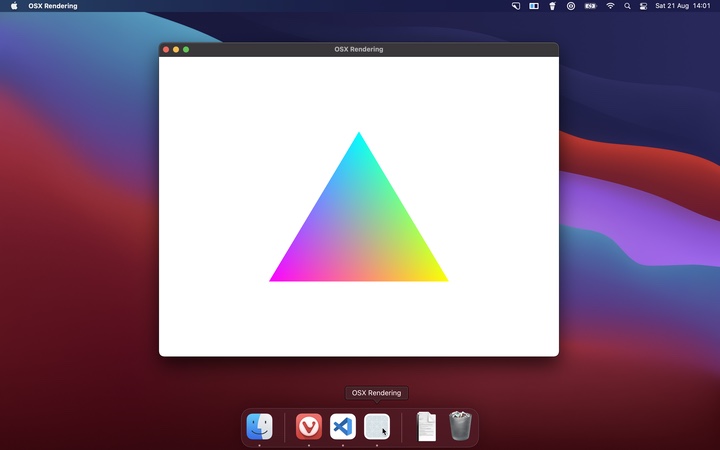
A triangle! On macOS!
Initializing OpenGL on macOS wouldn’t be too hard, if only someone took the time to document it. Actually, that’s not fair. There are a few articles out there that describe how to do it, it’s just that they all start with: so, you open Xcode…
A window
Creating a window isn’t all the complicated: you create it, you show it, you run the app. Here’s the code.
#include <AppKit/AppKit.h>

int main() {
  NSWindow* window = [NSWindow alloc];
  [window initWithContentRect: NSMakeRect(0, 0, 800, 600)
          styleMask:           NSWindowStyleMaskTitled |
                               NSWindowStyleMaskClosable |
                               NSWindowStyleMaskMiniaturizable |
                               NSWindowStyleMaskResizable
          backing:             NSBackingStoreBuffered
          defer:               NO];

  [window makeKeyAndOrderFront: nil];

  [NSApp run];
}
Oh right. You’re probably new to the whole Objective-C thing. Well, don’t worry. So was I and it didn’t take too much to understand code like this.
Functions in Objective-C
A basic function call in Objective-C looks like this.
[object function];
As the name implies, Objective-C deals with objects, so the line above calls a function called function on an object called object. Actually, Objective-C prefers the name method instead of function. It’s the same thing, though.
Now you should be able to decipher a line like this.
[NSApp run];
You might like to know that NSApp is a singleton, but even without that information, you may have surmized that this runs the app. Here’s a line with a return value.
NSWindow* window = [NSWindow alloc];
This allocates memory for a window and returns the pointer to that window. Where it gets a bit funky, is when parameters get involved. Take a look at this.
[window makeKeyAndOrderFront: nil];
makeKeyAndOrderFront is a function that takes one parameter. The parameter isn’t named. Here, it receives the value nil. Now look what happens when a function takes multiple parameters.
[window initWithContentRect: rectangle
styleMask:  NSWindowStyleMaskTitled
backing: NSBackingStoreBuffered
defer: NO];
All parameters must be named, except the first one, which cannot be named. The fact that the first parameter can’t be named, leads to some weird function names. Like in this example. The function should be called init and the first parameter contentRect, but instead we have a function called initWithContentRect. Once you know this, reading Objective-C becomes a lot easier.
Note that there are no commas between the parameters. Also, something about those square brackets makes me forget to put a semicolon at the end of the line. Those are my biggest struggles with the language.
A window, again
Now it should be a little easier to decipher the code.
#include <AppKit/AppKit.h>

int main() {
  NSWindow* window = [NSWindow alloc];
  [window initWithContentRect: NSMakeRect(0, 0, 800, 600)
          styleMask:           NSWindowStyleMaskTitled |
                                NSWindowStyleMaskClosable |
                                NSWindowStyleMaskMiniaturizable |
                                NSWindowStyleMaskResizable
          backing:             NSBackingStoreBuffered
          defer:               NO];

  [window makeKeyAndOrderFront: nil];

  [NSApp run];
}
The first line creates an object of type NSWindow. To initialize the window, I need to pass four parameters. contentRect is the position and size of the window. On macOS, the coordinates (0, 0) are at the bottom left of the screen. All other 2D screen coordinate systems I’ve seen put the origin at the top left, but whatever. styleMask determines the behavior of the window: it has a title bar and can be closed, minimized, and resized. backing can only have the value NSBackingStoreBuffered, so that one’s easy. defer is a technicality I don’t much care about, but you can read about it in the documentation. NO, by the way, is the same thing as false. Can you guess what true is in Objective-C?
makeKeyAndOrderFront gives the window mouse and keyboard focus (makeKey) and puts it in front of the other windows (OrderFront), except that it doesn’t do the latter, but I’ll get back to that in a bit. The parameter indicates which object initiated the call, but it’s inconsequential for what I’m doing. nil, by the way, is the same thing as NULL.
The final line starts the app’s event loop.
The event loop
Every app, regardless of platform, enters an event loop. Here it checks for events, like: did the mouse move, did the window resize, is the laptop about to go to sleep? It then sends a message to whomever expressed interest in a particular event.
Well, I’d like to express interest in the did the window close event, because if my window is gone, I might as well quit the app. To receive messages about the window, I need to register a window delegate. And because Objective-C likes the object oriented thing, I have to override a method for the specific message I’m interested in.
Classes in Objective-C
Here’s what the class for the window delegate looks like.
@interface WindowDelegate : NSObject<NSWindowDelegate>
- (void) windowWillClose:(id)sender;
@end

@implementation WindowDelegate
- (void) windowWillClose:(id)sender {
  [NSApp terminate:self];
}
@end
Objective-C wants you to split your class definition into two parts: an interface and an implementation. The interface tells you the methods and properties of the class, the implementation contains the code for the methods. C++ does the same thing, but pretty much every language designed after C++ and Objective-C has gotten rid of this arcane practice.
The interface declaration says my class is called WindowDelegate, that it derives from NSObject and that it implements the interface NSWindowDelegate. Except, Objective-C calls it a protocol instead of an interface, but that makes no functional difference.
There’s one method, called windowWillClose. The - in front of it indicates that it’s an instance methods. Class methods have a + in front of them. The function has the return type void (i.e. it doesn’t return anything) and it has one parameter of type id. Note that the parameter does have a name here, otherwise you can’t refer to it in the implementation.
With this, I can now create a window delegate, which I do right before I start the event loop. I do this in two steps. First I allocate some memory, and then I initialize the object.
WindowDelegate* delegate = [[WindowDelegate alloc] init];
Then I tell my window about my delegate, so it can send me messages.
[window setDelegate:delegate];
Compiling the program
One of the main reasons I use Objective-C, is that I can compile it using the C-compiler, so no need to run multiple compilers.
clang window.m -o window -framework AppKit
By convention, Objective-C files have the extension .m.
Initializing the app
When you run the code I showed you so far, you’ll notice that, yes, there is a window, but it doesn’t behave properly. It doesn’t start at the front and you can’t select it in the app switcher or in Mission Control. Turns out, the app requires some initialization.
[NSApplication sharedApplication];
[NSApp setActivationPolicy:NSApplicationActivationPolicyRegular];
[NSApp activateIgnoringOtherApps:YES];
Let’s ask the documentation for some help in deciphering this code.
[NSApplication sharedApplication]This method also makes a connection to the window server and completes other initialization.
Other initialization? Whoa, enough with the specifics already! Anyway. Connecting to the window server sounds important when you’re trying to display a window.
NSApplicationActivationPolicyRegularThe application is an ordinary app that appears in the Dock and may have a user interface.
Why regular isn’t the default is beyond me, but there you go.
[NSApplication activateIgnoringOtherApps]When the Finder launches an app, using a value of NO for flag allows the app to become active if the user waits for it to launch, but the app remains unobtrusive if the user activates another app.
That’s true if Finder launches the app, but not if Visual Studio Code does it, so I set it to YES.
Menu
The important thing to note about the menu, is that the main menu contains menu items and those menu items contain the sub items.
NSMenu* main_menu = [[NSMenu alloc] init];
[NSApp setMainMenu:main_menu];

NSMenuItem* app_menu_item = [[NSMenuItem alloc] init];
[main_menu addItem:app_menu_item];

NSMenu* app_menu = [[NSMenu alloc] init];
[app_menu addItemWithTitle:@"Quit" action:@selector(terminate:) keyEquivalent:@"q"];
[app_menu_item setSubmenu:app_menu];
Application name
This part is needlessly confusing. There are four places where I want the application name to show up and all of these follow different rules.
Menu bar
- Uses the
CFBundleNamevalue fromResources/en.lproj/InfoPlist.strings(whereenis a language code). - If that’s not available, uses the
CFBundleNamevalue fromInfo.plist, but only if the app is inside a bundle. - If that’s not available, uses the name of the executable.
Window title
- Uses the name set in code by calling
[NSWindow setTitle]. - If the name isn’t set in code, the window has no title.
Dock
- Uses the name of the bundle, i.e. the name of the folder that the executable is in.
- If the app isn’t inside a bundle, uses the name of the executable.
Activity Monitor
- Uses the
CFBundleDisplayNamevalue fromResources/en.lproj/InfoPlist.strings(whereenis a language code). - If that’s not available, uses the
CFBundleNamefromResources/en.lproj/InfoPlist.strings(whereenis a language code). - If that’s not available, uses the
CFBundleDisplayNamevalue fromInfo.plist, but only if the app is inside a bundle. - If that’s not available, uses the
CFBundleNamevalue fromInfo.plist, but only if the app is inside a bundle.
My main gripe isn’t that the rules are different for each of these—I mean, some of them even make sense—but rather the fact that this isn’t documented clearly. Seriously, I don’t think that anybody can definitively tell you what the difference is between CFBundleDisplayName and CFBundleName. Most answers tell you: just let Xcode handle it. Xcode sets both to the same value, by the way. Is it really that hard to document stuff like this? At least, now you have my cheat sheet.
You should know that Info.plist is an XML-file with some metadata about the app. Your app only picks up the file if you create a bundle, but fortunately that is easy to do: copy the executable and Info.plist into a folder that has a name that ends with .app.
The stuff about InfoPlist.strings is in case you want to translate the name of your app to other languages, which I don’t.
Here’s my Info.plist for reference.
<?xml version="1.0" encoding="UTF-8"?>
<!DOCTYPE plist PUBLIC "-//Apple//DTD PLIST 1.0//EN" "http://www.apple.com/DTDs/PropertyList-1.0.dtd">
<plist version="1.0">
<dict>
    <key>CFBundleIdentifier</key>
    <string>tech.basicbits.spike-macos-rendering</string>

    <key>CFBundleExecutable</key>
    <string>spike-macos-rendering</string>

    <key>CFBundleName</key>
    <string>macOS Rendering</string>

    <key>CFBundleName</key>
    <string>macOS Rendering</string>
</dict>
</plist>
NSOpenGLView
OpenGL is a library that allows you to issue commands to the graphics card. If all you need is buttons and list views, then it’s easier to let the operating system deal with this, but I’m after something that’s a bit less standard, so I prefer the control of a graphics library. OpenGL isn’t the only one. There’s also DirectX and Vulcan and Metal, but OpenGL is the only one that works on Windows, Mac, and Linux, so I figure it’s a good starting point, even though Apple really wants me to switch to Metal. Maybe later.
There’s an NSOpenGLView I can add to my window and that acts like a canvas for OpenGL. Of course, I need to put my draw calls somewhere and since we’re being object oriented, this involves deriving a class and overriding a function.
#include <OpenGL/gl3.h>

@interface RenderView : NSOpenGLView
- (void) drawRect: (NSRect) bounds;
@end

@implementation RenderView
- (void) drawRect: (NSRect) bounds {
  glClearColor(1.0f, 0.5f, 1.0f, 0.0f);
  glClear(GL_COLOR_BUFFER_BIT);

  [[self openGLContext] flushBuffer];
}
@end
Just ignore all the deprecation warnings; I’m using OpenGL whether Apple likes it or not. Also, I need to instruct the compiler to include OpenGL.
clang window.m -o window -framework AppKit -framework OpenGL
You may have noticed that the OpenGL calls, don’t look like Objective-C, they look like C. Well, they are and this is why I picked Objective-C over Swift: mixing it with C is effortless.
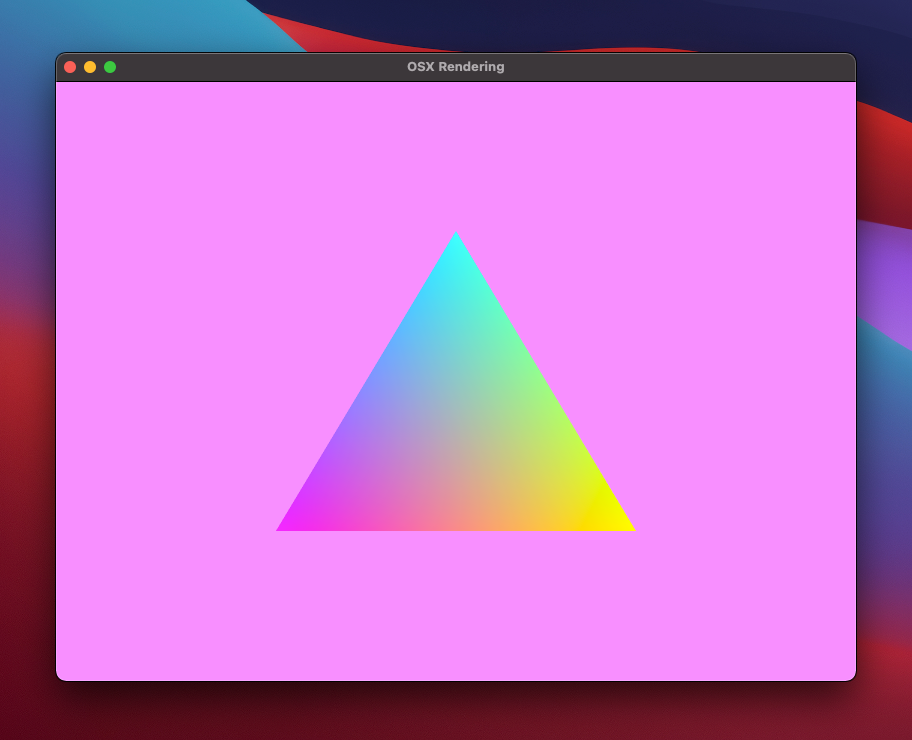
I set the background color to something that won’t escape your attention, but if you’d run the program now, you’ll notice that your eyeballs are spared. That’s because I still need to initialize OpenGL. First, I’ll have to ask the operating system for a pixel format that it can support. I want something that uses hardware acceleration, double buffering, and eight bits per color.
NSOpenGLPixelFormatAttribute opengl_attributes[] = {
  NSOpenGLPFAAccelerated,
  NSOpenGLPFADoubleBuffer,
  NSOpenGLPFAColorSize, 24,
  NSOpenGLPFAAlphaSize, 8,
  NSOpenGLPFADepthSize, 24,
  NSOpenGLPFAOpenGLProfile, NSOpenGLProfileVersion3_2Core,
  0
};

NSOpenGLPixelFormat* pixel_format = [NSOpenGLPixelFormat alloc];
[pixel_format initWithAttributes:opengl_attributes];
Then I’ll instruct my view to use that pixel format and add the view to the window.
NSView* content_view = [window contentView];
NSRect contentBounds = [content_view bounds];
RenderView* render_view = [RenderView alloc];
[render_view initWithFrame:contentBounds pixelFormat: pixel_format];
[content_view addSubView:render_view];
[pixel_format release];
Finally, OpenGL needs to know what the current render context is.
NSOpenGLContext* context = [render_view openGLContext];
[context setView:content_view];
[context makeCurrentContext];
I now have a window on Mac, ready to receive OpenGL calls. No Xcode required!
Triangle!
Drawing a triangle is standard OpenGL. There are plenty of tutorials available on the web if you want to know how to do that.
Source code
If you’re a Patreon supporter on the Source Code tier, you can get the assembled code from GitHub, including the OpenGL calls that draw the triangle.